"She looketh well to the ways of her household, and eateth not the bread of idleness." Proverbs 31:27

Tuesday, May 31, 2011

Yarn Cake

You may be wondering why I took a picture of my cake before I cleaned off my table?  That's easy, I was running late and figured I would take a good picture when I got to my friend's house.  My friend's daughter, Ashleigh turned 20 on Monday.  I normally don't like to bake cakes on Sunday, but I needed to get it baked last night.  I baked my honey whole wheat pound cake ( recipe here:  http://missyscakesandaprons.blogspot.com/2010/05/honey-whole-wheat-pound-cake.html )  With a strawberry filling.  I decorated it first thing on Monday morning since the party was at 1:00 in Ft. Worth.
I had the pink yarn spell out Happy Birthday and the purple yarn spell out Ashleigh on the side of the cake.  I was in a bit of a time crunch on this cake and was not able to take very many pictures I'm afraid.  It took me almost an hour to make the basket weave (which I love to make)  I could already tell that it was starting to "shift" from the filling here, but I had put "support straws" in to keep the layers from sliding, it was a three layer cake.
Saturday night I printed out a 20 and placed parchment paper over it to use as my guide to make a 20 out of royal icing.  I "roped" the royal icing to make it look like a crocheted piece of yarn.  Sunday night I turned it over and re-enforced it by looping royal icing of the same color around it.  I laid a lollipop stick on the side of the 0 in the icing then added more icing on top of that and let it dry again over night.  It was the last thing I added to the cake and I stuck it beside the ball of yarn that was the same color and had my yarn sticking down from the 0 connected to the ball of yarn.
I took a tip 21 and tip 22 and drew a continuous line of v across the top, alternating colors trying to make it look like a knitted sweater.  I wanted to do a rope border, but I think my tip ten must have been a garbage disposal casualty because I could not find it anywhere!  (That is why a lot of my decorating tools are dumped on the table, I was looking for it).  So I just used the tip 21 and used it to make a rope border.
I did not have a square baking pan and Ashleigh really wanted a square cake, so I made 3 - 9x13s, stacked and filled them, then cut the end off to make it fit on the platter.  I took the end pieces that had some filling and a tiny bit of frosting and stuck it in my fridge while I finished decorating the cake.  I have tried making cake balls before and it was a mess!  But I decided to go ahead and try making the balls of yarn out of big cake balls.
I made them the size of my hand and then added and decorated one ball of yarn at a time to the cake.  There was not enough room to add all the balls so I did add one ball to the side of the cake to write her name in yarn with.  I think they turned out pretty good!  A lot better then a big ball of frosting or fondant!
Here comes the fun part!  I live in TX and yesterday it was like 95 degrees outside.  I think I may have put too much filling in the cake, combined with the heat on the buttercream, and then a bumpy ride on the Highway with a 30 minute drive to Ft. Worth, my cake separated right where I had put my support straw to keep it from moving!

I tried to "hold" it together the best I could on the drive there, but it still looked like there had been an earthquake right down the end!  And of course it was the side that Said Happy birthday Ashleigh!  I was so sad.  :(  I tried to fix it the best I could, but I had not brought all my tips with me, or the off-white buttercream.  There really was not much I could do!  So this is what it looked like afterwards.
I tried to "stitch" the crater back together using frosting and I tried to cover the mess on the side with "scribbles" of yarn.

I had to "stitch" all around the cake where it separated! It started melting in her hot kitchen so she stuck it in the freezer.  I hope it tasted ok after being in the freezer.  You can see the slope on the cake, so sad!

I hope you enjoyed my cake disaster story!
Missy

Friday, May 27, 2011

I finished my dress!

I finally finished my dress!  I bought this material like 3-4 months ago and did not start sewing on it until about 3 weeks ago.  I had to finally take time out and finish it this week so that I could have a dress ready for the summer of no pants challenge.  That's why my blog has been so quiet this week! 

When I finished the dress it was way too big, so I added two darts to the bodice in the front and the back.    It was still too big so I added some elastic sewn into the sides.  As you can tell it is still a tad too big and since it has no zipper, I think I will add some ties to the back to make it look nicer.  I used an old pattern someone had given me, and according to the measurements I took I was supposed to cut out a size 16/18 which I thought was huge, but figured the pattern ran big.  I was wrong!  LOL  The pattern did not include the underskirt, but I added that for fun!
Excuse my lack of shoes, I took this picture before we left for church, but I was waiting until the last minute to put on my shoes since I had painted my toenails earlier!  LOL  I hate wearing shoes and avoid them when I can!  Precious was walking around my feet while Chris was trying to take my picture, he's the grey and white one.  The orange and white one, Muffin is the one in my arms.  Sorry about the terrible pictures!
I added this picture so you could see my headband.  Isn't it pretty?  My friend Ashley from Church crochets them, and there is a button on the headband so that you can interchange the color of the flower!
I also made my jewelry, which is not something I am very good at, but I wandered into a bead shop and fell in love with the beads!  My friend Miracle (13 yrs) had to fix a couple of my mistakes though!  She makes the jewelry at my church, and is a very talented young lady!  We have some very talented ladies at my church!
See here for an update on how to make casings for this dress which I added later :  http://missyscakesandaprons.blogspot.com/2011/06/easy-casings.html
Thanks for looking!
Missy

Wednesday, May 18, 2011

Summer of No Pants

I found a new blog I just started following.  They are having a "Summer of No Pants"  challenge where you are challenged to sew a new skirt or dress once a week for four weeks.  It is from May 23 to June 17.  I have to admit that I have a dress and a jumper already started though, I'm trying to get ready for my vacation to Florida this summer.  I love jumpers because they are loose and breezy.  Speaking of jumpers, I found a really nice pattern here: http://www.mariemadelinestudio.net/ .  They sell fabric, patterns, quilts, ready made dresses, skirts, aprons, bags, etc.  Be sure to check it out.
Be sure to check out the new blog I'm following, they will be having all kinds of tutorials during the challenge.
http://www.hideousdreadfulstinky.com/p/summer-of-no-pants-2011.html
Just overlook the title!  LOL  I think this will be fun!
Several ladies in my church want to make a dress that I found a great tutorial for here:  http://go.tipjunkie.com/hm/952/kojodesigns.blogspot.com/2011/04/guest-tutorial-from-tea-rose-home.html
We are going to make it for next sewing circle project!
I'm still learning how to sew, so I don't feel confident enough to do tutorials, so I hope you enjoy the ones I've shared!  Anybody want to join the challenge with me?
Happy Sewing
Missy

Tuesday, May 17, 2011

A couple of things I've made

Remember the cute apron pattern that I tested out with the rag quilt look?  Someone at Antique Alley asked me to make her a half apron with pockets.  She wanted black, pink and white with a cross.  I made the apron and never could get a hold of her.  I guess she changed her mind, but I think it turned out pretty cute.  I put 3 pockets on the front.
Bobbie from a vision to remember asked me to review another pattern for her.  My friend Skye needed a nursing cover, so I offered to make her one.  This is how it turned out:

Isn't it cute?  You can get the pattern for the nursing cover here:  http://www.etsy.com/shop/avisiontoremember

I am really enjoying the rag quilt look, can you tell?

Have a great day ya'll!
Missy

Monday, May 16, 2011

Sweet Jubilee Cake Show

Susan Hamilton allowed me to interview her about the upcoming Sweet Jubilee Cake Show

1. Tell me a little about yourself:
I was a theater major in college and am now a supervisor at Texas Instruments. (That makes much sense doesn't it? LOL) However it is hard to turn my back on the love of art so I don't. I am currently trying to use both sides of my brain.  It is all still a work in progress. I am now on the Denison Arts Council and can talk and hang out with some wonderfully creative people. I still love to act and try different kinds of arts. I tried my hand at cake decorating with Sheryl Robinson at Patty Cakes in Sherman, Tx. I met the funnest group of people and so talented. I had fun doing the classes but I figured out that it wasn't for me for me. I wasn't good at it. What I love about cakes, is that it does not matter  if you have cupcakes that you have made in your hands people like to see you coming. That is the art of cake and cake decorating for me.

2. What is the Sweet Jubilee Cake and Sugar Arts Show?
The Sweet Jubilee Cake and Sugar Art Show will be a party showcasing the wonderful Cake and Sugar Artist as artists in our community. It will be accompanied by a street festival outside and an art show intermingled throughout the entire event.

3. How many years has this show run?
This is our first year. So we hope to make it fun!!

4. What are the dates and times?
June 18th 10am - 6pm in the 400 block of Main Street Denison Tx. The website is:   smalltownbigart.com/events to get the map of the area. We will have the 400 block for festival type festivities outside and the cake and sugar and vendors in the different art galleries. The galleries that will be housing the cakes and sugar art as well as the demonstrations will be Mary Karams at 404 West Main Street, Images is 408 West Main, and then there is the 416 West Gallery which is at ......416 West Main :) . The Sweet Spot show will be at 413 West Main Street at the Artplace Gallery and Framing. The Sweet Spot will be several of the local artists using different painting and techniques to create their own version of sugar art. It has been hush hush.....I have not see the pieces yet and am anxiously awaiting the unveiling of the show on June 1st as it will run through the whole month.

5. Who will the judges be?
The judges are Carley King from the Sugar Wonders Cake Club in Allen, TX, Ryan Coffey of Frosted Art Bakery, and Porsha Kimble from the Sweet Sensations Cake Club in Arlington, TX and teacher of cake decorating classes.

6. Will there be any kind of demonstrations? If so, by whom?
Cristy Alcorn Russell will put together a wonderful cupcake bouquet and also a wedding cake demo, Michelle Foster will pull sugar flowers and Ryan Coffey will be doing a sculpted  fish bowl cake.

7. What can we expect to see at the show?
Aside from the obvious sweet art.....we will have all kinds of neat booths such as jewelry makers, soap and candle makers and music. We will have the neat antique malls open as well as a lot of the shops will have sidewalk sales and the art galleries will be open. We also have recently opened the Denison Farmers Market, which is just a street over so there will be plenty to do and see in Denison. All the shops and restaraunts around Main Street will be open for everyone to play, shop and eat. You can admire the art, cake and sugar art and watch demonstrations. Every year I say I am going to do what my mom says and shop throughout the year for Christmas and I think I will have the opportunity at this time. By the way, in this town there is always the possibilty of sporadic drum circles and hooping.

8. I've noticed it is part of the Denison Art Show, do you consider cake decorating an art form?
YES!! Denison has a lot of art shows as they are a wonderful art district with some very talented artists. We decided on the cake show and then some of the gallery owners have challenged some of the artists in the galleries to bring out their sweet tooth for some of their future pieces. Either way the artists have wonderful art in the galleries year round but we hope to enhance and challenge our artists to bring out some "bakery potential artwork".

Thank you Susan!  It sounds pretty exciting, it is definitely not your typical cake show!

Who plans on going?

Wednesday, May 11, 2011

Rag Quilted Bible Cover

Tiger wanted to help me show off my new bible cover.  Last week I decided I needed a new bible cover.  I bought my old one over ten years ago.  I don't like the new ones in the store, I guess I'm a little old fashioned for them.  I love the rag quilt look, but these directions can be modified to a regular cover also.  Wouldn't it pretty using material that has bible verses all over it or toile?
The first thing to do is measure your bible.  Mine is 9 in. by 6 in. My bible cover is almost too tight, so you might want to try adding an extra 1/2 inch to all your measurements and be sure to add however big a hem you want to the measurements.   If you are doing the rag quilt look, add an extra inch to each piece you cut so that you can have a half inch seam to fray.  I did a 1/4 seam around the sides and like the way it turned out also!

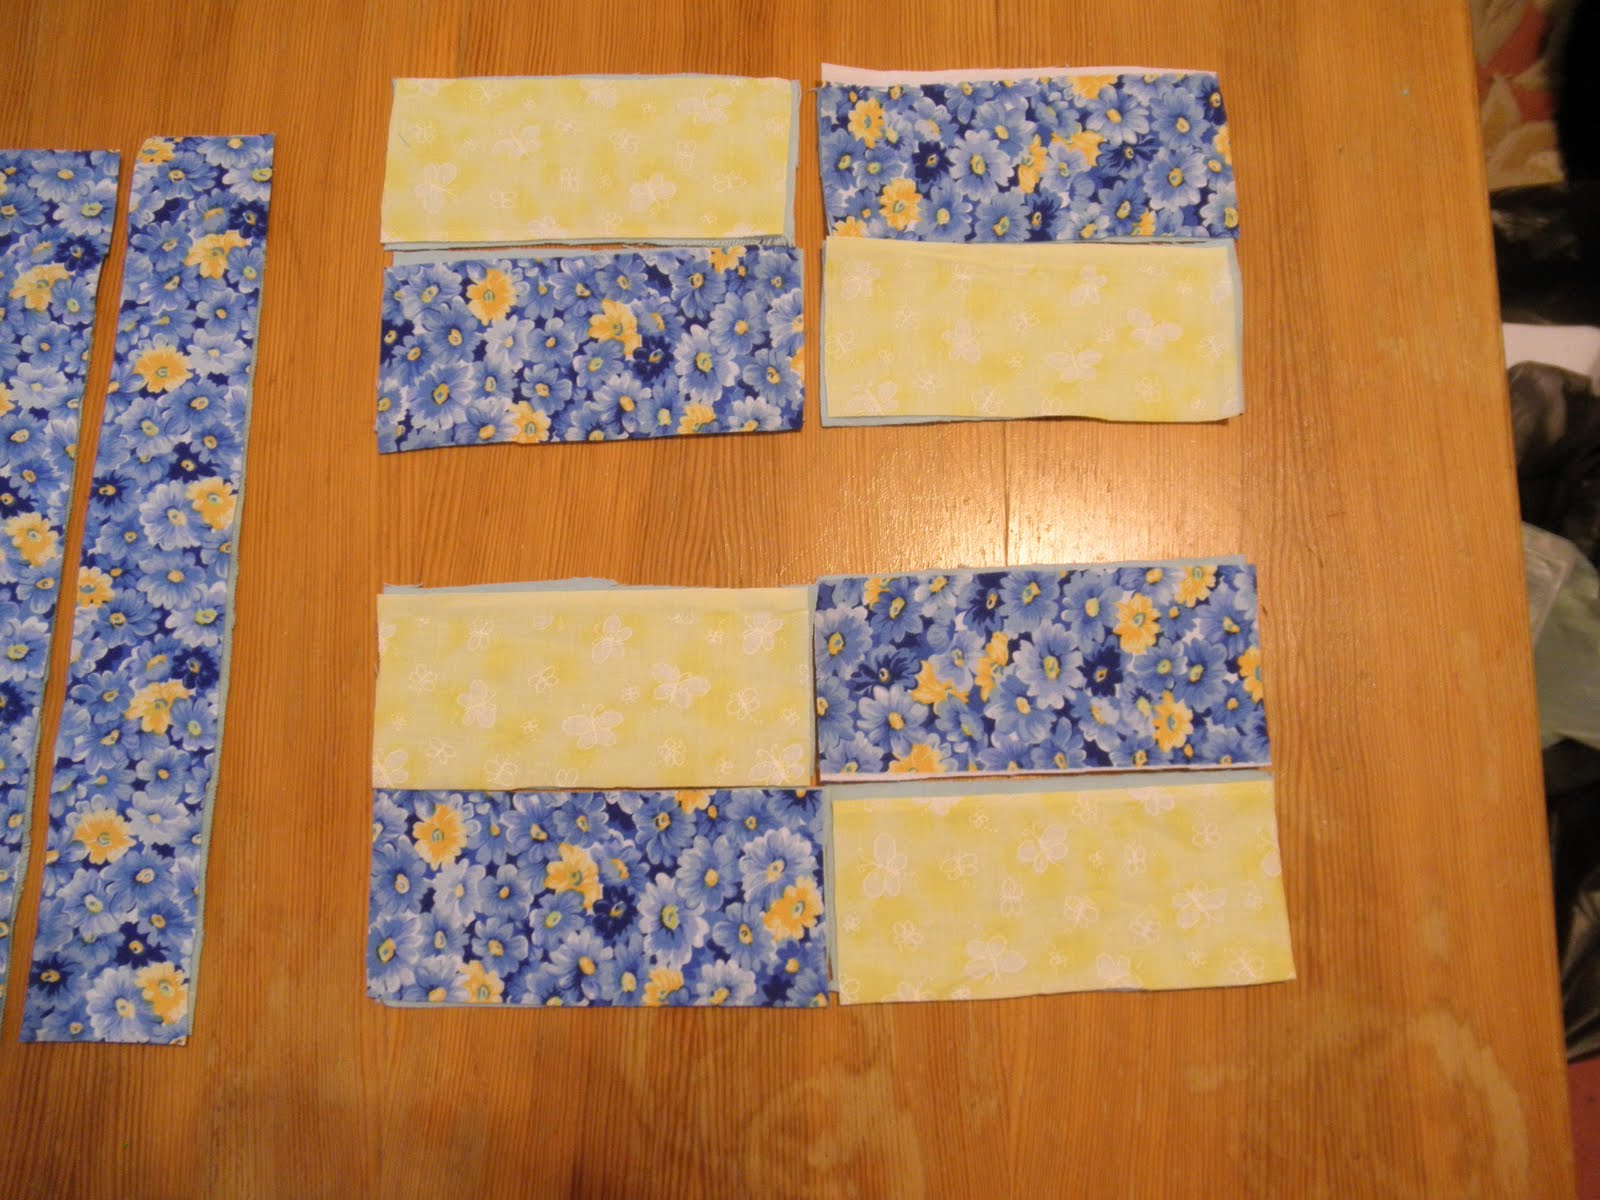
Once I figured out how big I wanted all my pieces I cut myself a pattern out of paper.  This makes it easier to cut then using a ruler, and the measurements are ready for my next bible cover.  Plan out which print you want to go where.  Cut from the cotton and flannel the same cuts.  The flannel is what does the fraying.
This is what I used:
For the main fabric behind the pockets (outside)
Cut 2 - 7in x 9 1/2 in.  (this was tight which will be fine if you had already washed your material, otherwise you might want to go with 10 in. instead.)  I used the daisy material on this.

Inside Flap
Cut 2 - 5 in. x 9 1/2 in.  (width should be same as outside) daisy material

Bottom of Bible (Spine)
Cut 1 - 2 1/2 in x 9 1/2 in (adjust width if necessary) daisy material


I messed up on my pockets and for some reason cut them an inch short on the length.  I wanted this pattern for the front and back pockets:


To sew your pockets like this you need:
cut 8 - 3 1/2 in x 5 in  4 flowers and 4 yellow butterflies

Since I cut my strips 2 1/2 in I sewed six of them them side by side all the way across and got this:

If you want this pocket:
cut 6 - 2 1/2 in x 5 1/2 strips (3 yellow and 3 flowers) 


For this pocket which has two small pockets on the front for pens:
Cut 1 - 6 in x 9 1/2 in (adjust width as necessary) flowers material
Cut 2 - 2 1/2 in x 5 1/2 in. ( I hadn't planned this or I would have cut one of the pen pockets out of the daisy material and the other out of the yellow)


Straps:
Cut 4 cotton and 2 flannel - 12 in x 1 1/2 in.  (The straps in the picture are bigger, but I cut them down) 2 flowers and 2 daisies.  I cut 2 extra cotton pieces for the straps since both sides would be seen.

Closure:
cut 1- 2 in x 5 in yellow fabric (Can be cut down more depending on the look you want)

Notice how I used all three materials to encompass the straps and the closure?


1.  The first step is to lay out all of your pieces before you start to make sure it will work, that's how I realized my pocket pieces were cut wrong and had to rethink it.
(I am going to give you the directions for the pockets I ended up making)
2.  Sew the pocket pieces together first.  (You will be using a 1/2 in. seam in all places unless otherwise noted)
* Pocket A:  Alternating the patterns sew the six pieces together length-wise to make one long strip.  Be sure to sew all pieces flannel to flannel so the seams will be sticking out the front.  Sew a hem stitch across the top.  (This will prevent the top from fraying too much.)  disclaimer - I don't know if hem stitch is the correct term.

3. Lay the pocket front on top of the outside cover.  Pin the sides together with the bottom of the pocket on the bottom of the cover.  Sew the sides only. (I had to use a 1/4 in. seam on the sides since I cut it too small)
4. Pin the bottom (spine) to the cover with the pocket(flannel to flannel) and sew across all three(cover, pocket and spine) pieces at the same time.  Remember to use your 1/2 in seam here.

* Pocket B
5.  Sew the strips for the pen pockets together.  Sew a hem stitch across the top. Just like the previous pocket.

6. Sew the pen pockets onto the main pocket.  Sew down the middle (along one of the seams) to make two small pockets for pens.  Sew a hem stitch across the top of the main pocket, above the pen pockets.
7. Place the large pocket on the front cover with the bottom of the pocket lined up with the bottom of the cover.  Sew the sides only, avoiding the seam from the pen pockets.  (Again I had to use 1/4 seam since I had cut too small.)

8.  Line the bottom of the cover, flannel to flannel, with the other side of the spine part.  Sew along all three pieces (cover, pocket, and spine)remembering to use a 1/2 in. seam.
9.  Sew a 1/4 in. hem stitch around the straps and the closure.
10.  Pin the closure and straps in between the cover and flap.  Make sure the same pattern is facing outward on both sides.  Pin the straps the same distance on both sides.  Put your bible inside to see how far over you want your closure to go.  I have mine closing onto the pocket, beside the pen pockets.  It is almost centered, but I wanted to avoid the pen pockets.  Do both sides for the inside flaps and the straps.  I sewed my closure on the side of Pocket A which is my back side.

11.  Starting on the sides, sewing a 1/4 in seam if your cut is small, 1/2 in seam if your cut is large, (Make sure it is the same as the rest of the side seams) sew up one side of the flap (move the pen pocket material out of the way), pivot your material and sew across the top, re-enforcing the straps and the closure, then pivot and sew down the other side.  Repeat for the other side. 
All sides and pockets should be sewn now.
12.  Of course the closure is optional, but I have a tendency to spill everything out of my bible without one.  Sew velcro to the closure ( I had to switch my thread to yellow for the top of the closure) and to the top of the pocket.  I then sewed a cute flower button on top.
13.  Using sharp, small scissors clip your seams avoiding sewing.  Clip about 1/8 of an inch apart for a more ragged look.
14.  Wash the bible cover and tumble dry to "puff" out the ragged look.

Here is the front of the bible cover.
I wish I had thought of making a monogram "M" for the big pocket, but didn't think of it until later.  I found some rhinestone stickers with my initials.  We'll see how long it stays on.

Here is the back of the cover.  Tiger was helping me model!

Here is the spine of the cover.  This was my firswt tute like this to write, so don't hesitate to ask any questions.  I think it would be pretty easy to adapt to a normal bible cover too. 
Thanks for following!
Missy

Tuesday, May 10, 2011

Penguin Beach Cake Tute part 2

Isn't he cute?  I borrowed a surf board from my neighbor girl's littlest pet shop as a pattern for my surfboard.  It was easier to make him laying down then standing on the surf board.
My little swimmer was originally supposed to have a duck floaty, but my husband said it did not look like a duck head, so I tore it's head off!  LOL
To make the water is pretty simple.  It works better with buttercream, but I had used royal icing which dries pretty quick.  I scooped some buttercream into a separate bowl and add the light blue food dye.  Don't mix it all the way in so it is swirly.  Cover the section where the water will be thinly with white icing.  Take the blue and "plop" mounds all over the white.  Take your spatula and swirl it all around, having a tiny bit of white swirlies is good.  Use dark blue in the piping gel and swirl it over the water, but do not completely cover the water.  See the different colors in the water?  It dried very sticky on top of the royal icing and some of my "sand" fell in it at the show and I could not get it out.  :(
I made the sand out of crushed cinnamon graham crackers.  I think next time I need to make my royal icing thinner to hold the sand better.  I'm also thinking a shaker to pour out the sand would be better then using my hands.
 I used red dusting powder to make the daddy penguin's sunburn.  I just brushed it on dry with a paint brush.


I loved it when I saw the episode on cake boss when he made the coral out of isomalt.  I could not find any info. on how to make it and I had never worked with isomalt before.  I searched the web on how to cook it and came up with a lot of conflicting info.  I know I cooked mine wrong because it clouded up up, but I think it looked good on the coral that way!  LOL


You can do this with any kind of sugar, whether it be cane sugar, palm sugar or isomalt.  Isomalt is a type of sugar that is easier to work with.  Be careful when working with hot sugar, it is one of the worst burns you can get!  If you do burn yourself, do not pull the sugar off - run it under cold water to disintegrate it.   Give yourself plenty of time to work.  After the isomalt was ready I poured into a Pyrex measuring cup and colored it.  Next time I will have separate pots and leave it in the pot simmering while I color each color.

I put different size ice cubes in a bowl, I'm thinking of trying the ice from Sonic next time. I'll still use different sizes though.   I put the orange on one side of the bowl and the pink on the other side of the bowl.  I kept checking periodically and pouring out the water as the ice melted.  When the isomalt was cool (It will be smooth on top and look nothing like coral yet) I dumped it upside down on a paper plate and let it dry.  The bottom part is what looks like the coral, after it drys just break it into whatever sizes you want.

If anyone has any hints on working with isomalt, I would love to hear it!

For part one of this tutorial, go here: http://missyscakesandaprons.blogspot.com/2011/05/penguins-at-beach-cake.html

Here are some pictures my husband took of me getting my cake ready for the show.
Now you know what the cake shows look like when everyone is scrambling to get their cakes together before the show opens!
Thank you for joining me!
Missy

Sunday, May 8, 2011

Jane Kirkpatrick

Jane Kirkpatrick had a Mother's Day contest where we were supposed to write about our mother.  I only had like five minutes to write it before I went out of town.  Boy was I surprised I won Runner's Up.  If you want to get to know me a little better through my mother's story, go here:

http://janeswordsofencouragement.blogspot.com/2011/05/mother-daughter-stories-of-secrets_07.html

I had an amazing mother!

Happy Mother's Day!

Saturday, May 7, 2011

Banana Oatmeal Walnut and Raisin Cookies

I made some delicious banana oatmeal raisin walnut bars.  Remember my oatmeal raisin walnut bars from here:  http://missyscakesandaprons.blogspot.com/2010/04/oatmeal-raisin-walnut-bars.html ?  I wanted a cookie with bananas, so I modified this recipe.  They turned out great, in fact they would be perfect for when you are in a hurry and need to grab something quick for breakfast for you and the kids.  They are very soft and could be made into cookies instead of bars if you want to.

Ingredients:
1/2 cup (1 stick) plus 6 tablespoons butter, softened
3/4 cup firmly packed brown sugar    (or replace 1 1/3 cup palm sugar for both sugars)
1/2 cup granulated sugar
2 eggs
1 teaspoon vanilla
3 ripe bananas - mashed  (I use my potato masher for this!)
1-1/2 cups all-purpose flour
1 teaspoon baking soda
1 teaspoon ground cinnamon
1/2 teaspoon salt (optional)
3 cups oats(quick or old fashioned, uncooked)
1 cup raisins
1 cup walnuts
. .Preparation :

Heat oven to 350°F. In large bowl, beat butter and sugars on medium speed of electric mixer until creamy. Add eggs and vanilla; beat well. Add bananas and stir in.  Add combined flour, baking soda, cinnamon and salt; mix well. Add oats, walnuts and raisins; mix well.
Drop dough by rounded tablespoonfuls onto ungreased cookie sheets.
Bake 8 to 10 minutes or until light golden brown. Cool 1 minute on cookie sheets; remove to wire rack. Cool completely. Store tightly covered.

For cookie bars which I think are better: Bake 30 - 35 minutes in an ungreased 13x9-inch metal baking pan.

I like making them bars because it is less work, but if you have a bunch of little kids, they would probably go too fast in your house!

Happy Baking!
Missy

Friday, May 6, 2011

Penguins at the Beach Cake

I finally found out how to download the pictures from my phone, and this is a much better picture of my cake.  One of my facebook friends asked me if it tasted as good as it looked, I informed him that I didn't think he would want to eat it since it was made out Styrofoam!  I bought my Styrofoam at Hobby Lobby, it was too expensive to order a real cake dummy.  The cake dummies were cheap but the shipping for them was outrageous!  My cheap Styrofoam worked just as well!  Don't forget your Hobby Lobby coupon though!


My poor Mommy penguin broke, here is before the car ride and after the car ride.  Her wings were all nice and spread out, and then she fell off during the car ride and her wings were flattened and cracked.
I did not take many pictures during the decorating process, it was too late at night and I was in a hurry!  But I did take some. 


This cute little guy was the first I made, and he turned out very cute!  I made the feet first, and put toothpicks in the feet and added water to make the body stick to the toothpick.  It made the penguins off-centered so I had to add a toothpick to the back underside of the penguin to keep him upright.   Next I made an egg shape but after a while, she shrunk and wrinkled, so I ended up having to make the body out of rice krispies treats on my girls.


I dried some wings up against the sponge to give them a "flip" .  I wanted the baby's wings sticking out since he was playing in the sand so I put him up against the sides of the tray I was making him on and let the wings "rest" on the lip of the tray until they were dried.


 I love my crabs! I made the feet and let them dry in "u" shapes and then picked the ones that were closest in size to put on the

crabs.  After the legs dried I attached them with water.


I found a tutorial for making the beach ball here: http://sugarteachers.blogspot.com/2010/06/lifes-beach.html?utm_source=feedburner&utm_medium=feed&utm_campaign=Feed%3A+-sharingAndCaring-CakeDecoratingAndSugarArtTutorials+%28%7ESugar+Teachers%7E+-Cake+Decorating+and+Sugar+Art+Tutorials%29
Except, I free handed the sections of color and did not leave a spot white - I felt that looked unfinished. 
 
 
I used one of my flat fondant tools to make the marks in the turtle.  I pretty much free-handed the rest of him.


I loved my octopus.  I stuck the end of a paintbrush into the head to make the mouth.  I made the body first, then the legs.  I stuck the legs on underneath.


    I also made a little bucket and shovel that I filled with royal icing and then "sand". 
I ran out of time and did not cover the edge of the board with a ribbon.  Both judges docked me ten points each for that.  I also did not put anything on the back, which I had planned on but had to redo some of my penguins so did not have time to make anymore items.  I will definitely plan better next time!
 
  This is a pretty long post, so I'll let you know in the next post how to make the coral, shells, sand and water.
 
 
 Be sure to click here to learn more about the cake show I entered!
http://missyscakesandaprons.blogspot.com/2011/05/north-tx-cake-show-pictures.html

"Oh taste and see that the Lord is good: blessed is the man that trusteth in Him." Psalm 34:8